Install Atlas Device SDK
Atlas Device SDK for C++ enables client applications written in C++ to access data stored on devices and sync data with Atlas. This page details how to install the C++ SDK in your project and get started.
You can use the Atlas Device SDK for .NET to develop apps in C# .NET with several frameworks, including .NET MAUI, Xamarin, Avalonia UI, UWP, Unity, and others.
Use Atlas Device SDK to build a Flutter project or a standalone Dart project. This guide provides instructions for installing the SDK in a standalone Dart project. For details about installing the SDK in a Flutter project, refer to Install Atlas Device SDK for Flutter.
The Atlas Device SDK for JavaScript enables development of applications using the JavaScript and TypeScript languages. The JavaScript library is best suited for writing server-side applications. Your application could be one component in a wider stack that also includes iOS and Android apps.
The JavaScript library is not suitable for front-end application development.
The Atlas Device SDK for Kotlin supports the following platforms. Each has its own installation method and requirements:
Android
Kotlin Multiplatform (KMP)
Atlas Device SDK for Swift enables you to build iOS, macOS, tvOS, and watchOS applications using either the Swift or Objective-C programming languages. This page details how to install the SDK in your project and get started.
Atlas Device SDK for Swift enables you to build iOS, macOS, tvOS, and watchOS applications using either the Swift or Objective-C programming languages. This page details how to install the SDK in your project and get started.
The Atlas Device SDK for JavaScript enables development of applications using the JavaScript and TypeScript languages. The JavaScript library is best suited for writing server-side applications. Your application could be one component in a wider stack that also includes iOS and Android apps.
The JavaScript library is not suitable for front-end application development.
Requirements
Minimum C++ standard: C++17.
For development on macOS: Xcode 11.x or later.
For development on Windows: Microsoft Visual C++ (MSVC).
Otherwise, we recommend git and CMake.
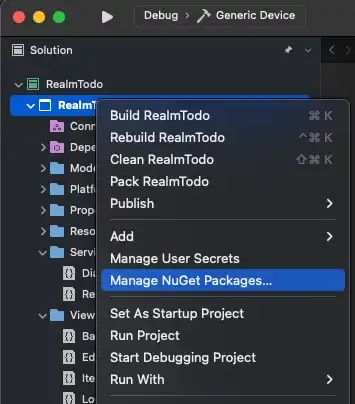
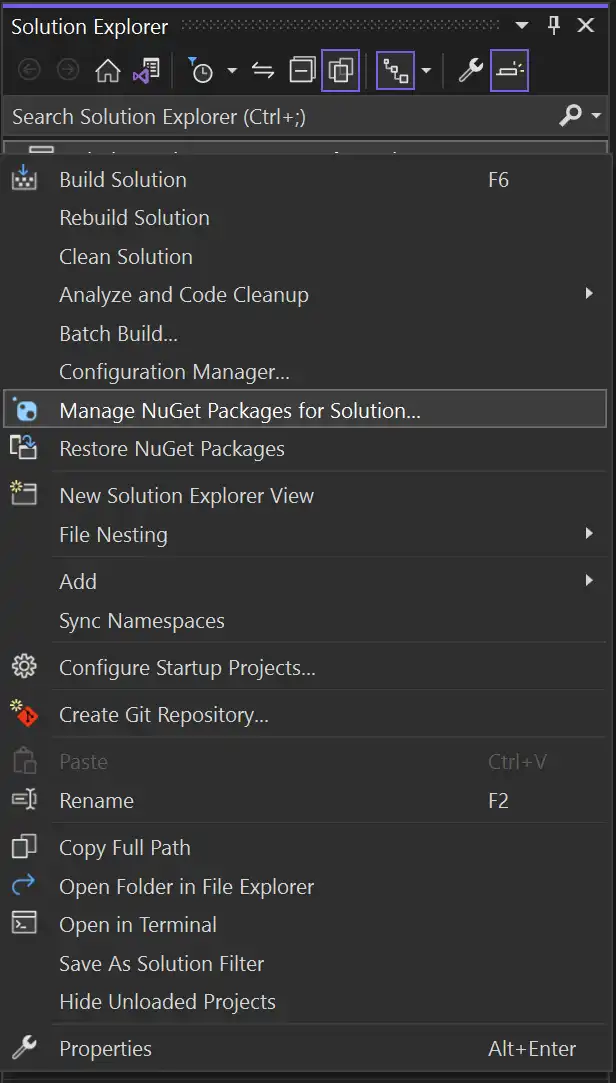
Before getting started, ensure you have installed Visual Studio:
Visual Studio 2015 Update 2 or later.
Visual Studio for Mac 7.0 or later.
For standalone Dart apps, you can install Dart in your development environment without Flutter. To learn how, refer to the official Dart Installation Guide.
The latest version of Atlas Device SDK requires Dart version 3.3.0 or later.
Supported Platforms
When using the SDK in a Flutter or standalone Dart project, you can build for the following platforms:
iOS
Android
macOS
Windows running on 64-bit architecture
Linux running on 64-bit architecture
Important
Unsupported Platforms
The SDK does not currently support the following platforms through the Dart or Flutter libraries:
Web
Windows running on ARM64 or 32-bit architectures
Linux running on ARM64 or 32-bit architectures
Visit the respective "Build for Platforms" page for more details about library and language support:
Before getting started, ensure your environment meets the following requirements:
Node.js version 12.x or later (including Node.js version 14)
Linux, macOS 10.8 (or later), or Windows 8 (or later)
Before getting started, ensure your development environment meets the following prerequisites:
Android Studio Bumblebee 2021.1.1 or higher.
JDK 11 or higher.
Kotlin Plugin for Android Studio, version 1.6.10 or higher.
An Android Virtual Device (AVD) using a supported CPU architecture.
Additionally, Kotlin Multiplatform (KMP) for mobile projects require the following:
Kotlin Multiplatform Mobile (KMM) Plugin for Android Studio, version 0.3.1 or higher.
A Kotlin Multiplatform (KMP) App created using the "Kotlin Multiplatform App" template in Android Studio. Follow the instructions in the Kotlin Multiplatform documentation.
For more details on setting up your KMP environment, refer to the official Kotlin Multiplatform for mobile documentation. To verify your environment setup, follow Kotlin's guide to checking your environment.
Tip
Kotlin Plugin Version
The Kotlin Multiplatform (KMP) ecosystem frequently changes. If you experience any issues installing the SDK, check your Kotlin Plugin version, since outdated plugins can lead to difficult to debug errors. To see which versions of the Kotlin Plugin are compatible with the SDK, refer to the Kotlin SDK changelog.
Supported Target Environments
Kotlin Multiplatform (KMP) supports a wide range of application environments Refer also to Kotlin's Multiplatform Gradle DSL reference: Targets documentation.
The Kotlin library supports the following environments:
androidiosArm64iosSimulatorArm64iosX64jvmmacosArm64macosX64
The Kotlin library does not support the following environments:
androidNativeArm32androidNativeArm64androidNativeX86androidNativeX64iosArm32jslinuxArm32HfplinuxArm64linuxMips32linuxMipsel32linuxX64mingwX64mingwX86tvosArm64tvosSimulatorArm64tvosX64wasm32watchosArm32watchosArm64watchosSimulatorArm64watchosX86watchosX64
If you want to build for an environment that the Kotlin library does not support, consider using one of the other libraries. For more information, refer to these "Build for Platform" pages:
Before getting started, ensure your development environment meets the following prerequisites:
Your project uses an Xcode version and minimum OS version that the library supports. Refer to Supported Target Environments on this page for more details.
Reflection is enabled in your project. The Swift SDK uses reflection to determine your model's properties. Your project must not set
SWIFT_REFLECTION_METADATA_LEVEL = none, or the SDK cannot see properties in your model. Reflection is enabled by default if your project does not specifically set a level for this setting.
Supported Target Environments
Important
There are special considerations when using the SDK with tvOS. See Build for tvOS for more information.
Xcode 15
Changed in version 10.50.0: Minimum required Xcode version is 15.1
Supported OS | Realm Database | Atlas App Services |
|---|---|---|
iOS 12.0+ | X | X |
macOS 10.14+ | X | X |
tvOS 12.0+ | X | X |
watchOS 4.0+ | X | |
visionOS 1.0+ | X | X |
App Download File Size
The SDK should only add around 5 to 8 MB to your app's download size. The releases we distribute are significantly larger because they include support for the iOS, watchOS and tvOS simulators, some debug symbols, and bitcode, all of which are stripped by the App Store automatically when apps are downloaded.
Before getting started, ensure your environment meets the following requirements:
Node.js version 12.x or later (including Node.js version 14)
Linux, macOS 10.8 (or later), or Windows 8 (or later)
Install the SDK
Tip
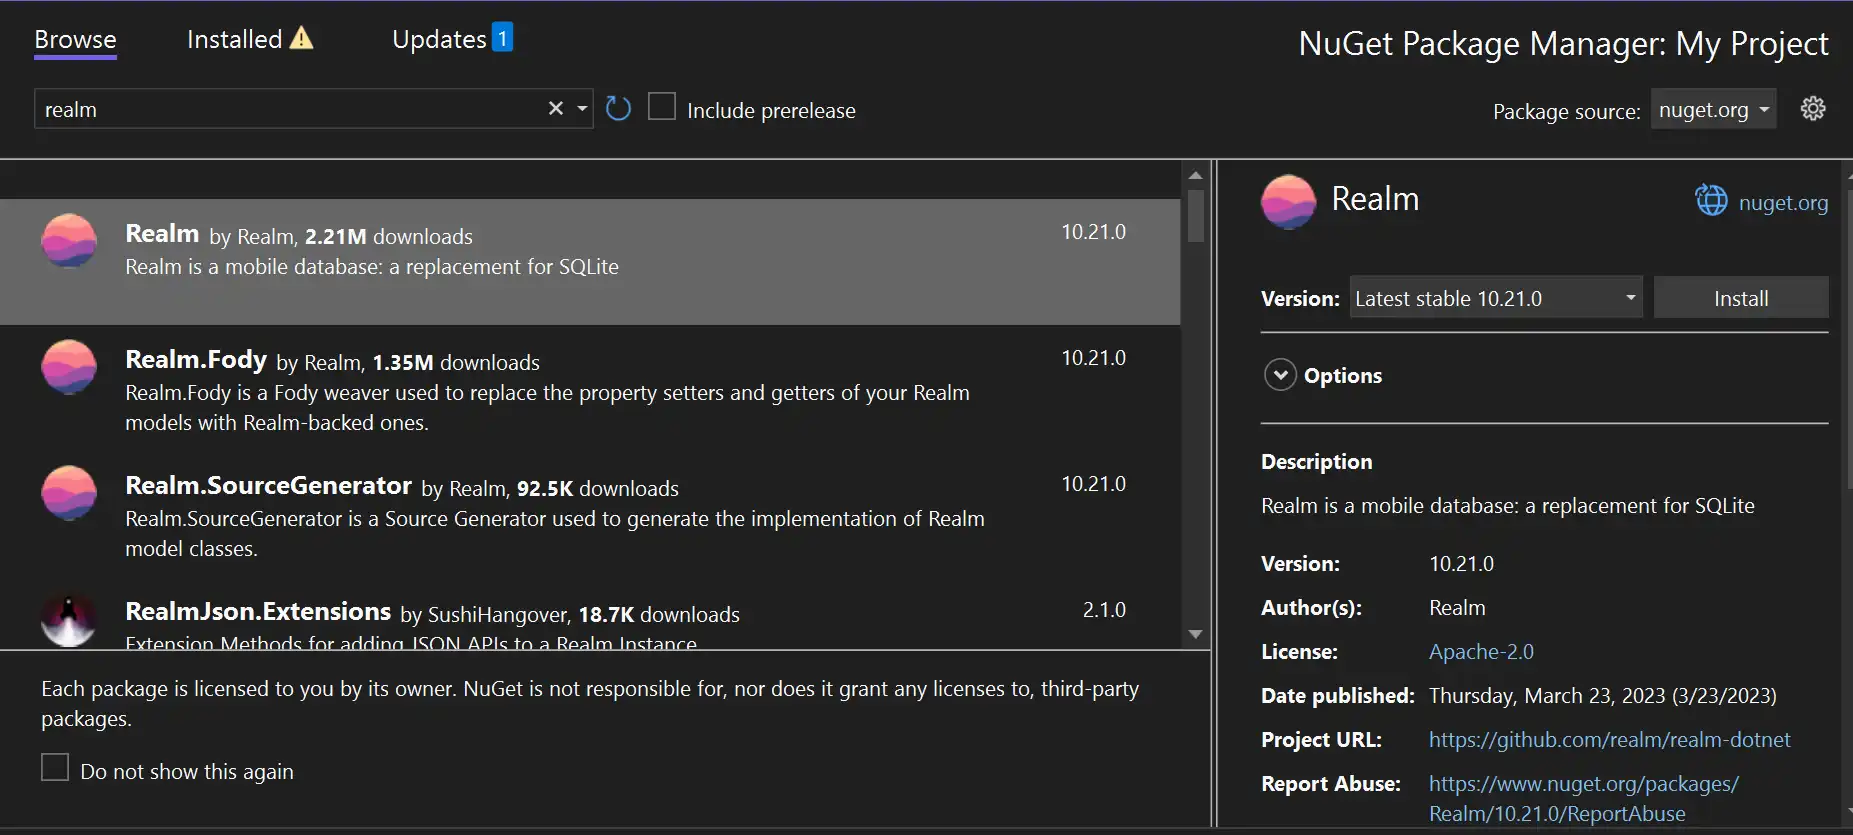
Atlas Device SDK and Realm
The SDK uses Realm Core database for data persistence on the device. When you install the SDK, the package names reflect Realm naming.
When developing with Xcode, you can use Swift Package Manager (SPM) to
install the SDK's realm-cpp library.
You can use CMake with the FetchContent module to manage the SDK and its dependencies in your C++ project.
Create or Modify CMakeLists.txt
Create or modify your CMakeLists.txt in the root directory of your
project:
Add
Include(FetchContent)to include the FetchContent module in your project build.Use
FetchContent_Declareto locate the SDK dependency and specify the version tag you want to use.Use the
FetchContent_MakeAvailable()command to check whether the named dependencies have been populated, and if not, populate them.Finally,
target_link_libraries()links the SDK dependency to your target executable.
To get the most recent version tag, refer to the releases on GitHub: realm/realm-cpp.
Set the minimum C++ standard to 17 with set(CMAKE_CXX_STANDARD 17).
In a Windows install, add the required compiler flag:
if(MSVC) set(CMAKE_CXX_FLAGS "${CMAKE_CXX_FLAGS} /Zc:preprocessor /bigobj") endif()
Example
cmake_minimum_required(VERSION 3.15) project(MyDeviceSDKCppProject) # Minimum C++ standard set(CMAKE_CXX_STANDARD 17) # In a Windows install, set these compiler flags: if(MSVC) set(CMAKE_CXX_FLAGS "${CMAKE_CXX_FLAGS} /Zc:preprocessor /bigobj") endif() # Include the FetchContent module so you can download the C++ SDK Include(FetchContent) # Declare the version of the C++ SDK you want to download FetchContent_Declare( cpprealm GIT_REPOSITORY https://github.com/realm/realm-cpp.git GIT_TAG v1.0.0 ) # The MakeAvailable command ensures the named dependencies have been populated FetchContent_MakeAvailable(cpprealm) # Create an executable target called myApp with the source file main.cpp add_executable(myApp main.cpp) target_link_libraries(myApp PRIVATE cpprealm)
Run CMake
Run CMake in a gitignored directory, such as build, to generate the build
configurations that you can then use to compile your app:
# build/ is in .gitignore mkdir build cd build cmake .. # Create Makefile by reading the CMakeLists.txt in the parent directory (../) make # Actually build the app
You can use CMake to generate more than simple Makefiles by using the -G
flag. See the CMake documentation for more
information.
Important
Install the SDK for all projects
If you have a multi-platform solution, be sure to install the SDK for all of the platform projects, even if the given project doesn't contain any SDK-specific code.


Create a Project
To create a Dart project, run the following commands:
dart create <app_name> cd <app_name>
For more information, refer to Dart's Get Started Guide for standalone Dart command-line and server applications.
Add the SDK to the Project
To add the SDK to your project, run the following command:
dart pub add realm_dart
This downloads the realm_dart package, and adds it to your project.
In your pubspec.yaml file, you should see:
dependencies: realm_dart: <latest_version>
After the package is added, run the following command to install it:
dart run realm_dart install
This downloads and copies the required native binaries to the app directory.
Update the Package Version
To change the version of the SDK in your project, perform the following steps:
Regenerate Object Models
Changes to the package version may affect the functionality of the object models. From the command line, run the following command to regenerate object models with new and updated functionality:
dart run realm_dart generate
Important
SDK v2.0.0 Breaking Change to Generated Files
SDK version 2.0.0 introduces an update to the
builder, which impacts how files generate. In v2.0.0 and later, all
generated files use the .realm.dart naming convention instead of .g.dart.
This is a breaking change for existing apps. For information on how to upgrade an existing app from an earlier SDK version to v2.0.0 or later, refer to Upgrade to Flutter SDK v2.0.0.
Create a Node.js Project
Create your Node.js project by creating a new directory
for your project and running npm init in that
directory. In the example below, replace MyApp
with your desired project name. Answer all of the prompts
to fill out the details of your project.
mkdir MyApp && cd MyApp && npm init
Enable TypeScript (optional)
TypeScript is a superset of JavaScript that adds static type checking and other features intended to make application-scale development more robust. If you'd like to use TypeScript, follow the TypeScript team's official Node Starter guide. The SDK supports TypeScript natively and integrates easily into a TypeScript project.
Add the SDK to the Project
Add io.realm.kotlin, specifying the library version and
apply false, to the list of plugins in your project-level Gradle
build file, typically found at <project>/build.gradle:
plugins { id 'io.realm.kotlin' version '1.16.0' apply false }
Add the following to your app-level Gradle build file, typically
found at <project>/app/build.gradle:
Add
io.realm.kotlinto the list of plugins.Add the following to the list of dependencies:
Add
io.realm.kotlin:library-baseto the dependencies block.If using Device Sync in your application, add
io.realm.kotlin:library-syncto the dependencies block.
To use coroutines with the SDK, add
org.jetbrains.kotlinx:kotlinx-coroutines-coreto the list of dependencies.
plugins { id 'com.android.application' id 'org.jetbrains.kotlin.android' id 'io.realm.kotlin' } android { // ... build configuration settings } dependencies { implementation 'io.realm.kotlin:library-base:1.16.0' // If using Device Sync implementation 'io.realm.kotlin:library-sync:1.16.0' // If using coroutines with the SDK implementation 'org.jetbrains.kotlinx:kotlinx-coroutines-core:1.7.0' }
Add the SDK to the Project
Add the following to your app-level Gradle build file, typically found at
<project>/app/build.gradle:Add
io.realm.kotlinto the list of plugins.Add the following to the list of dependencies:
Add
io.realm.kotlin:library-baseto the dependencies block.If using Device Sync in your application, add
io.realm.kotlin:library-syncto the dependencies block.
To use coroutines with the SDK, add
org.jetbrains.kotlinx:kotlinx-coroutines-coreto the list of dependencies.
App build.gradleplugins { kotlin("multiplatform") kotlin("native.cocoapods") id("com.android.library") id("io.realm.kotlin") version "1.16.0" } version = "1.0" kotlin { android() iosX64() iosArm64() sourceSets { val commonMain by getting { dependencies { implementation("io.realm.kotlin:library-base:1.16.0") // If using Device Sync implementation("io.realm.kotlin:library-sync:1.16.0") // If using coroutines with the SDK implementation("org.jetbrains.kotlinx:kotlinx-coroutines-core:1.7.0") } } } } If you use any part of the SDK inside the Android module, add the following compile-time dependencies to your module-level Gradle build file, typically found at
<project>/module/build.gradle:Android Module build.gradledependencies { compileOnly("io.realm.kotlin:library-base:1.16.0") } // If using Device Sync dependencies { compileOnly("io.realm.kotlin:library-sync:1.16.0") }
Specify Options
In the options for the realm-swift package, we recommend setting
the Dependency Rule to Up to Next Major Version,
and enter the current Swift library version . Then, click
Add Package.
(Optional) Build Realm as a Dynamic Framework
To use the Privacy Manifest supplied by the SDK, build Realm or
RealmSwift as a dynamic framework. If you build the library as a
static framework, you must supply your own Privacy Manifest.
To build the library as a dynamic framework:
In your project Targets, select your build target.
Go to the General tab.
Expand the Frameworks and Libraries element.
For the
Realmframework, change the Embed option from "Do Not Embed" to "Embed & Sign."
Now, Xcode builds Realm dynamically, and can provide the
SDK-supplied Privacy Manifest.
If you are installing with CocoaPods, you need CocoaPods 1.10.1 or later.
Add the SDK as a Dependency in Your Podfile
Add a use_frameworks! line to your Podfile if it is not
already there.
Add the line pod 'Realm', '~>10' to your main and test
targets.
When done, your Podfile should look similar to this:
platform :ios, '12.0' target 'MyDeviceSDKProject' do # Comment the next line if you don't want to use dynamic frameworks use_frameworks! # Pods for MyDeviceSDKProject pod 'Realm', '~>10' target 'MyRealmProjectTests' do inherit! :search_paths # Pods for testing pod 'Realm', '~>10' end
Resolve Build Issues
Some developers experience build issues after installing the SDK via CocoaPods or Carthage. Common causes of these issues include:
Installation issues:
Initial install failed
Using an unsupported version of the dependency manager
Build tool issues:
Build tools have stale caches
Updating build tool versions
Making changes to your project setup, such as:
Adding a new target
Sharing dependencies across targets
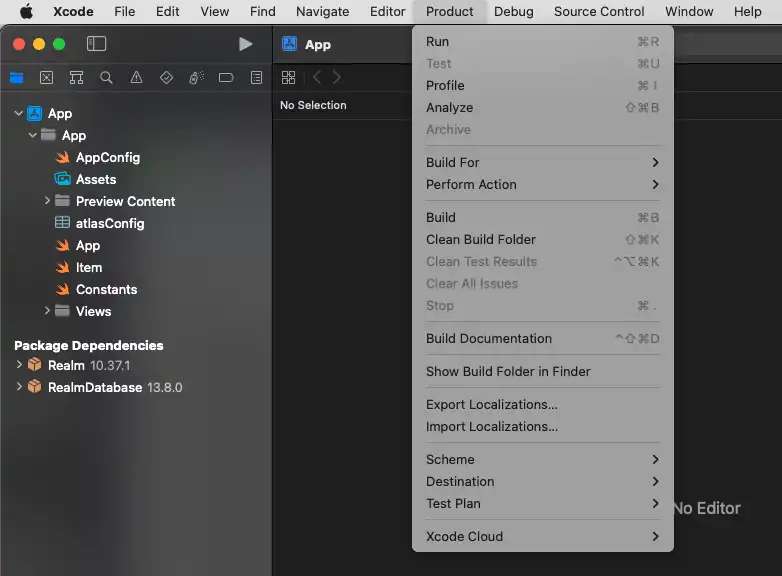
A fix that often clears these issues is to delete derived data and clean the Xcode build folder.
Reset the Cocoapods Integration State
Run these commands in the terminal, in the root of your project:
pod cache clean Realm pod cache clean RealmSwift pod deintegrate || rm -rf Pods pod install --repo-update --verbose # Assumes the default DerivedData location: rm -rf ~/Library/Developer/Xcode/DerivedData

If you are installing with Carthage, you need Carthage 0.33 or later.
Add the Frameworks to Your Project
Carthage places the built dependencies in the Carthage/Build
directory.
Open your project's xcodeproj file in Xcode. Go to
the Project Navigator panel and click your application
name to open the project settings editor. Select the
General tab.
In Finder, open the Carthage/Build/ directory. Drag the
RealmSwift.xcframework and Realm.xcframework files
found in that directory to the Frameworks,
Libraries, and Embedded Content section of your
project's General settings.


Resolve Build Issues
Some developers experience build issues after installing the SDK via CocoaPods or Carthage. Common causes of these issues include:
Installation issues:
Initial install failed
Using an unsupported version of the dependency manager
Build tool issues:
Build tools have stale caches
Updating build tool versions
Making changes to your project setup, such as:
Adding a new target
Sharing dependencies across targets
A fix that often clears these issues is to delete derived data and clean the Xcode build folder.
Reset Carthage-managed Dependency State
Run these commands in the terminal, in the root of your project:
rm -rf Carthage # Assumes default DerivedData location: rm -rf ~/Library/Developer/Xcode/DerivedData carthage update
Important
This will update all of your Carthage-managed dependencies, not just Atlas Device SDK.
Download and Extract the Framework
Download the latest release of the Swift library and extract the zip.
Copy Framework(s) Into Your Project
Drag Realm.xcframework and RealmSwift.xcframework (if using)
to the File Navigator of your Xcode project. Select the
Copy items if needed checkbox and press Finish.
Tip
If using the Objective-C API within a Swift project, we recommend you include both Realm Swift and Realm Objective-C in your project. Within your Swift files, you can access the Swift API and all required wrappers. Using the RealmSwift API in mixed Swift/Objective-C projects is possible because the vast majority of RealmSwift types are directly aliased from their Objective-C counterparts.
Specify Options
In the options for the realm-swift package, we recommend setting
the Dependency Rule to Up to Next Major Version,
and enter the current Swift library version . Then, click
Add Package.
(Optional) Build RealmSwift as a Dynamic Framework
To use the Privacy Manifest supplied by the SDK, build the library as a dynamic framework. If you build the library as a static framework, you must supply your own Privacy Manifest.
To build the library as a dynamic framework:
In your project Targets, select your build target.
Go to the General tab.
Expand the Frameworks and Libraries element.
For the
RealmSwiftframework, change the Embed option from "Do Not Embed" to "Embed & Sign."
Now, Xcode builds RealmSwift dynamically, and can provide the
SDK-supplied Privacy Manifest.
If you are installing with CocoaPods, you need CocoaPods 1.10.1 or later.
Add the SDK as a Dependency in Your Podfile
Add a use_frameworks! line to your Podfile if it is not
already there.
Add the line pod 'RealmSwift', '~>10' to your main and test
targets.
When done, your Podfile should look similar to this:
platform :ios, '12.0' target 'MyDeviceSDKProject' do # Comment the next line if you don't want to use dynamic frameworks use_frameworks! # Pods for MyDeviceSDKProject pod 'RealmSwift', '~>10' end
Resolve Build Issues
Some developers experience build issues after installing the SDK via CocoaPods or Carthage. Common causes of these issues include:
Installation issues:
Initial install failed
Using an unsupported version of the dependency manager
Build tool issues:
Build tools have stale caches
Updating build tool versions
Making changes to your project setup, such as:
Adding a new target
Sharing dependencies across targets
A fix that often clears these issues is to delete derived data and clean the Xcode build folder.
Reset the Cocoapods Integration State
Run these commands in the terminal, in the root of your project:
pod cache clean Realm pod cache clean RealmSwift pod deintegrate || rm -rf Pods pod install --repo-update --verbose # Assumes the default DerivedData location: rm -rf ~/Library/Developer/Xcode/DerivedData
If you are installing with Carthage, you need Carthage 0.33 or later.
Add the Frameworks to Your Project
Carthage places the built dependencies in the Carthage/Build
directory.
Open your project's xcodeproj file in Xcode. Go to
the Project Navigator panel and click your application
name to open the project settings editor. Select the
General tab.
In Finder, open the Carthage/Build/ directory. Drag the
RealmSwift.xcframework and Realm.xcframework files
found in that directory to the Frameworks,
Libraries, and Embedded Content section of your
project's General settings.
Resolve Build Issues
Some developers experience build issues after installing the SDK via CocoaPods or Carthage. Common causes of these issues include:
Installation issues:
Initial install failed
Using an unsupported version of the dependency manager
Build tool issues:
Build tools have stale caches
Updating build tool versions
Making changes to your project setup, such as:
Adding a new target
Sharing dependencies across targets
A fix that often clears these issues is to delete derived data and clean the Xcode build folder.
Reset Carthage-managed Dependency State
Run these commands in the terminal, in the root of your project:
rm -rf Carthage # Assumes default DerivedData location: rm -rf ~/Library/Developer/Xcode/DerivedData carthage update
Important
This will update all of your Carthage-managed dependencies, not just Atlas Device SDK.
Download and Extract the Framework
Download the latest release of the Swift library and extract the zip.
Copy Framework(s) Into Your Project
Drag Realm.xcframework and RealmSwift.xcframework (if using)
to the File Navigator of your Xcode project. Select the
Copy items if needed checkbox and press Finish.
Tip
If using the Objective-C API within a Swift project, we recommend you include both Realm Swift and Realm Objective-C in your project. Within your Swift files, you can access the Swift API and all required wrappers. Using the RealmSwift API in mixed Swift/Objective-C projects is possible because the vast majority of RealmSwift types are directly aliased from their Objective-C counterparts.
Create a Node.js Project
Create your Node.js project by creating a new directory
for your project and running npm init in that
directory. In the example below, replace MyApp
with your desired project name. Answer all of the prompts
to fill out the details of your project.
mkdir MyApp && cd MyApp && npm init
Enable TypeScript (optional)
TypeScript is a superset of JavaScript that adds static type checking and other features intended to make application-scale development more robust. If you'd like to use TypeScript, follow the TypeScript team's official Node Starter guide. The SDK supports TypeScript natively and integrates easily into a TypeScript project.
Import the SDK
Tip
Atlas Device SDK and Realm
The SDK uses Realm Core database for data persistence on the device. When you import the SDK, the package names reflect Realm naming.
Make the SDK available in your code by including the
cpprealm/sdk.hpp header in the translation unit where you want to use it.
Add the following line to the top of your source files to use the SDK:
Add the following line to the top of your source files to use the SDK:
Add the following line to the top of your source files (JavaScript or TypeScript) where you want to use the SDK:
In the files where you use the SDK, add the appropriate imports for the APIs you're using.
The Kotlin library APIs are divided into two modules:
Realm Kotlin SDK: APIs that deal with device database functionality, such as modeling data, reacting to changes, and type serializers.
Realm Kotlin SDK - Sync: APIs that deal with connecting to MongoDB for Device Sync, user authentication, calling an Atlas Function, and accessing MongoDB Atlas.
Refer to the API documentation for each respective module for API details.
Add the following line at the top of your source files to use the SDK:
Within your Swift files, you can access the Swift APIs and all required
wrappers. The vast majority of RealmSwift types are directly aliased from
their Objective-C counterparts.
In some cases, the Swift API reference documentation does not include details for the underlying Objective-C counterparts. You may need to drop down to the Objective-C API reference for more details.
Add the following line at the top of your source files to use the SDK:
Add the following line to the top of your source files (JavaScript or TypeScript) where you want to use the SDK:
using Realms;
import 'package:realm_dart/realm.dart';
import Realm from "realm";
// The documentation does not currently have this code example in Kotlin. // Please refer to the other languages or related pages for example code.
import RealmSwift
import Realm from "realm";
Platform-Specific Considerations
For details about installing the SDK and building for a specific platform, refer to the relevant platform pages:
Apple Privacy Manifest
When building for Apple platforms, Apple requires any apps or third-party SDKs that use required reasons APIs to provide a privacy manifest. The manifest contains details about the app's or SDK's data collection and use practices, and it must be included when submitting new apps or app updates to the Apple App Store.
Some of the SDK language and framework libraries provide a privacy manifest to streamline this process. The .NET library does not provide a privacy manifest. If your application is a cross-platform app that you intend to submit to the Apple App Store, you may be required to provide your own version of this privacy manifest.
For details, refer to The Atlas Device SDK Apple Privacy Manifest.
Apple Privacy Manifest
When building for Apple platforms, Apple requires any apps or third-party SDKs that use required reasons APIs to provide a privacy manifest. The manifest contains details about the app's or SDK's data collection and use practices, and it must be included when submitting new apps or app updates to the Apple App Store.
Some of the SDK language and framework libraries provide a privacy manifest to streamline this process. Starting in version 2.2.0, the Dart and Flutter libraries provide a privacy manifest.
For details, refer to The Atlas Device SDK Apple Privacy Manifest.
Supported Platforms
The installation instructions on this page assume you're using the JavaScript library in a server-side environment. For instructions installing the library for Internet of Things (IoT) devices, refer to Build for IoT.
Unsupported Platforms
Front-end Web Applications: due to limitations of the browser environment, it is not possible to build a browser-based web app with this library. For front-end web applications, refer to Build for Web.
Mobile App Development: For cross-platform mobile app development, refer to Build with React Native.
Apple Privacy Manifest
When building for Apple platforms, Apple requires any apps or third-party SDKs that use required reasons APIs to provide a privacy manifest. The manifest contains details about the app's or SDK's data collection and use practices, and it must be included when submitting new apps or app updates to the Apple App Store.
Some of the SDK language and framework libraries provide a privacy manifest to streamline this process. The Kotlin library does not provide a privacy manifest. If your application is a cross-platform app that you intend to submit to the Apple App Store, you may be required to provide your own version of this privacy manifest.
For details, refer to The Atlas Device SDK Apple Privacy Manifest.
Apple Privacy Manifest
Apple requires any apps or third-party SDKs that use required reasons APIs to provide a privacy manifest. The manifest contains details about the app's or SDK's data collection and use practices, and it must be included when submitting new apps or app updates to the Apple App Store.
The Swift and Objective-C libraries provide a privacy manifest to streamline this process.
To include these manifests in a build target that uses the Realm library,
you must build Realm as a dynamic framework. For details, refer to the
Swift Package Manager Installation instructions step
(Optional) Build RealmSwift as a Dynamic Framework.
For additional details, refer to The Atlas Device SDK Apple Privacy Manifest.
Swift Concurrency Support
The Swift SDK supports Swift's concurrency-related language features. For best practices on using the Swift SDK's concurrency features, refer to the documentation below.
Async/Await Support
Starting with Swift SDK Versions 10.15.0 and 10.16.0, many of the SDK's APIs support the Swift async/await syntax. Projects must meet these requirements:
Swift SDK Version | Swift Version Requirement | Supported OS |
|---|---|---|
10.25.0 | Swift 5.6 | iOS 13.x |
10.15.0 or 10.16.0 | Swift 5.5 | iOS 15.x |
If your app accesses the SDK in an async/await context, mark the code
with @MainActor to avoid threading-related crashes.
For more information about async/await support in the Swift SDK, refer to Swift Concurrency: Async/Await APIs.
Actor Support
The Swift SDK supports actor-isolated realm instances. For more information, refer to Use Atlas Device SDK for Swift with Actors.
Apple Privacy Manifest
Apple requires any apps or third-party SDKs that use required reasons APIs to provide a privacy manifest. The manifest contains details about the app's or SDK's data collection and use practices, and it must be included when submitting new apps or app updates to the Apple App Store.
The Swift and Objective-C libraries provide a privacy manifest to streamline this process.
To include these manifests in a build target that uses RealmSwift, you must
build RealmSwift as a dynamic framework. For details, refer to the Swift
Package Manager Installation instructions step
(Optional) Build RealmSwift as a Dynamic Framework.
For additional details, refer to The Atlas Device SDK Apple Privacy Manifest.
Supported Platforms
The installation instructions on this page assume you're using the JavaScript library in a server-side environment. For instructions installing the library for Internet of Things (IoT) devices, refer to Build for IoT.
Unsupported Platforms
Front-end Web Applications: due to limitations of the browser environment, it is not possible to build a browser-based web app with this library. For front-end web applications, refer to Build for Web.
Mobile App Development: For cross-platform mobile app development, refer to Build with React Native.